Getting Started
A friendly guide for anyone thinking about joining a Moodle QA testing cycle for the first time.
The Moodle 5.3 QA cycle opens 1st September 2026.
How to start
1. Set up your accounts create an account on the Moodle Tracker (that's where you will report your test results) and an account on moodle.org. Use the same email address for both accounts. You can do this anytime.
Details on setting up your accounts
Setting up your account on the Moodle Tracker
In order to assign tests to yourself and add comments you'll need to create an account on the Moodle Tracker. The Moodle Tracker is Moodle's issue-tracking system; it's how the whole community reports bugs and test results, not just testers. Sign-up takes a couple of minutes.
- Visit the Moodle Tracker login page.
- From there you can log in using your Google, Microsoft, Apple, or Slack accounts.
- If you prefer, you can manually create a new account by entering your email address and clicking "Sign up".
- Enter the 6-digit code emailed to you to proceed with the account creation.
- Enter your name and click "Create account".
Setting up your account on moodle.org
If you don't already have a moodle.org account, create one using the same email address as your Tracker account; this is how we credit you and generate your tester badge.
- Visit moodle.org and click "Create new account".
- Enter your age and country and click "Proceed".
- Read the site's policies and cookie policy, click the checkboxes to agree and then click "Next".
- Fill in the form and click "Create my account".
2. Once the QA cycle is open, choose a test to run. Start with an easy test that is unassigned or explore the full test case list. Both are the top two widgets on the QA testing dashboard. Once you find a test you like, assign it to yourself on the Moodle Tracker.
Details on picking your first test
Once the testing cycle is open, check for unassigned beginner test cases. This is the top widget on the dashboard. Test cases are written as a series of steps with an expected result.
You will see three columns:
- Key: indicates the ID of the test
- Summary: it's the title of the test
- Components: the part of Moodle the test belongs to (e.g. 'Book activity', 'Quiz'). Particularly useful if you want to focus on an area you're already familiar with.
Here's how to find and assign yourself a test:
- Browse tests for beginners in the first widget on the dashboard
- Once you find a test you are interested in, click on the MDLQA-XX under the 'Key' column.
- This opens the test on the Moodle Tracker.
- Read the whole thing once before assigning it to yourself, so you know what you're aiming for. You can see how many steps there are in the Description, so you can gauge how long it'll take.
- If you aren't interested, close it and keep browsing tests for beginners.
- If you're interested, assign it to yourself.
We'd suggest only assigning yourself tests you already have some familiarity with, or are genuinely curious to learn by doing. And you can unassign yourself from a test at any time; no explanation needed.
Full list of tests for beginners
3. Run the test. Avoid setting up your own Moodle site and use the Moodle QA testing site — the login details are available on the test site landing page.
Details on running a test on the shared site
Moodle QA testing site: Moodle QA Testing Site
⚠️ Before you start, remember a few points:
- The site resets hourly at the top of the hour (so at 01:00, 02:00, and so on) so please be mindful if you are running a long test.
- Don't enter any personal or sensitive information into the site.
- More information on the Moodle QA Testing Site can be found in the QA Process page
- When you start executing a test case, select the
Start testingaction to mark the test asIn Progress. - If you have some questions, check out the FAQ for further assistance.
4. Report the test result on the Moodle Tracker: mark it Pass or Fail, add a short comment about the results, and attach the screenshots.
Details on reporting your result
On the Moodle Tracker, mark the test Pass or Fail. Add a comment using the templates below; you can copy and paste them or use a browser extension.
Reminder: attach a screenshot and a short note if anything didn't work as expected. Your Pass/Fail marks are reviewed directly by the QA lead and used to sign off the release, so nothing you submit disappears into a void.
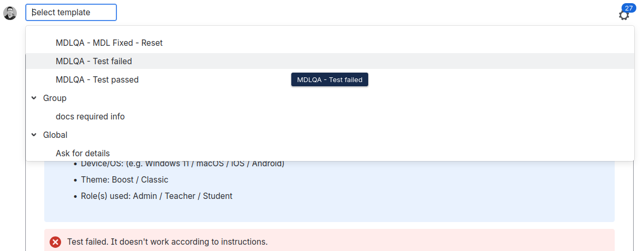
If something that's not related to the test fails, add the It doesn't work according to instructions. If you are unsure whether this is a bug or just a confusing step, describe your doubts here. Attached are screenshots or logs showing the failure: At least one screenshot per critical step. Screenshots may be grouped if appropriate. Works according to instructions. Test passed! Attached are screenshots for: At least one screenshot per critical step. Screenshots may be grouped if appropriate. (Please ensure you have attached the files to this Jira issue) By marking this test as PASS, I confirm that I followed the instructions exactly as written; all required preconditions were set up; no additional settings were modified; and the test description is up-to-date and clear. You can use these templates directly in Jira by installing the "Canned Responses Pro" for Jira browser extension. It's available for: After installing the extension, a "Select template" dropdown will appear above the Jira comment editor. From there you can select the templates "MDLQA – Test Passed" and "MDLQA – Test Failed"
qa_help_needed label and leave a comment with your question; we'll get back to you. And if the test instructions themselves seem outdated or unclear, add the qa_instructions_update label and note which steps need fixing; that feedback helps the next tester too.Template for a failed test
Template for a passed test
How to install these templates on the Moodle Tracker (browser extension)
This guide covers everything a new tester needs. If you'd like the complete picture, the QA testing documentation has all the technical specifications.
Thanks for considering this. Every test result helps, even if it's just one or two. Welcome aboard, and see you in the cycle 😊